directions
Creative Process
For a printable (pdf) version of the Directions, click here.
![]() Download one of our templates. There are 3 sizes of templates. The largest templates are for younger children, usually up to 1st grade. The smallest template is for older children who have good fine motor skills. Use one size template for the entire class. If in doubt, use a larger template. Many teachers make copies of the template and give one sheet to each child. This gives the child a chance to practice.
Download one of our templates. There are 3 sizes of templates. The largest templates are for younger children, usually up to 1st grade. The smallest template is for older children who have good fine motor skills. Use one size template for the entire class. If in doubt, use a larger template. Many teachers make copies of the template and give one sheet to each child. This gives the child a chance to practice.
![]() Use a black Sharpie Fine Point marker for the drawings. Please see directions at the top of each template page for more specific information. As a general rule, the line thickness should not be thinner than the ovals are on the template. We must reduce the larger templates up to 50%—thin lines will not show up on the shirt.
Use a black Sharpie Fine Point marker for the drawings. Please see directions at the top of each template page for more specific information. As a general rule, the line thickness should not be thinner than the ovals are on the template. We must reduce the larger templates up to 50%—thin lines will not show up on the shirt.
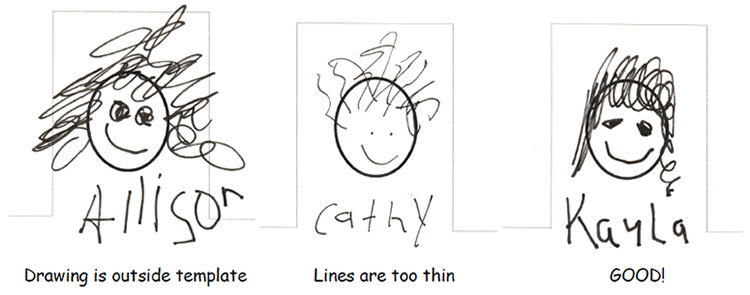
![]() Have the children draw their facial features and then print their name under the picture. It is ok for the name to dip a little below the guidelines. Do not draw on the outside lines of the template. See samples of student drawings below.
Have the children draw their facial features and then print their name under the picture. It is ok for the name to dip a little below the guidelines. Do not draw on the outside lines of the template. See samples of student drawings below.

![]() Make sure there are no smudges or other marks on the drawing. Remember, we cannot improve the quality of the drawing. If it doesn’t look good when you send it, it won’t look good when we print the shirt. Avoid extreme detail and thin lines.
Make sure there are no smudges or other marks on the drawing. Remember, we cannot improve the quality of the drawing. If it doesn’t look good when you send it, it won’t look good when we print the shirt. Avoid extreme detail and thin lines.
![]() When the drawings are done, trim the pictures just inside the template outline and below the name. Put the trimmed pictures in a small envelope and label with the school/teacher name and paperclip the envelope to your order form.
When the drawings are done, trim the pictures just inside the template outline and below the name. Put the trimmed pictures in a small envelope and label with the school/teacher name and paperclip the envelope to your order form.
![]() Determine the wording for the top of the shirt, choose the shirt color/sizes, ink color and complete all information on the order form. An email address is required so we can send a proof of the layout before printing. No job will start without your signed approval.
Determine the wording for the top of the shirt, choose the shirt color/sizes, ink color and complete all information on the order form. An email address is required so we can send a proof of the layout before printing. No job will start without your signed approval.
![]() Mail the completed order form/drawings to the address on the order form. Multiple class orders should be sent in one envelope.
Mail the completed order form/drawings to the address on the order form. Multiple class orders should be sent in one envelope.
